
Whether it’s a Mesa® Rugged Tablet running on Windows 10 or Android™ 9.0, Juniper Systems wants to help users get the most from this ultra-rugged tablet. In this article, we will discuss some of the features that can help you achieve more with the Mesa.
Ergonomics
The Mesa features comfortable ergonomics for all-day usability in the hand. The engineers at Juniper Systems designed the Mesa to be ergonomic to limit fatigue. Our in-house product design team worked through several device renditions before determining the perfect curvature, grip, and form of the device to provide the best experience to users in the field.
Users can comfortably use this ultra-rugged tablet to perform the entire data collection process without skipping a beat. Quickly snap a photo, record field notes, capture a GNSS location, or analyze data with ease from start to finish.
Click here for answers to other frequently asked questions related to the Mesa Rugged Tablet.
All-day battery life
The Mesa features an all-day battery life that allows users to meet or exceed eight hours on the job. Each Mesa is shipped with a large 43.2 WHr removable battery. A second 21.6 WHr internal battery can also be added to the device at purchase. This second battery not only provides hours of extended run time but also allows for the larger removable battery to be removed and hot-swapped with another battery. This versatility keeps users working all-day.
- 43.2 Whr battery provides 8-10 hours of battery life on the Windows version of the Mesa and 10-12 hours of run time on the Android version
- The 21.6 optional internal battery provides an additional 4-5 hours on Windows and 5-6 on Android.
For more information related to battery life and power tips, click here.
Desktop vs. tablet mode on the Mesa running Windows 10
Windows 10 offers tablet users a traditional Windows desktop experience or a more touch-oriented tablet mode. Users can easily toggle between the two. To get to the desktop mode on Windows 10, swipe from the right side of the screen to the left. Once you have swiped from the right side of the screen to the left, a notification screen will appear. In the top left of the notification screen, you can select the desktop mode by selecting the shortcut that changes the screen from the default mode of a tablet to desktop mode.
If you want to switch from desktop mode to tablet mode, then follow the same directions above to change the mode from desktop to tablet mode. Below is a video demonstration of how to arrive at your perfect mode with the toughest tablet running Windows 10.
How to optimize touch profiles for your work environment
The Mesa was designed to work in all environments. Different environments can change how users interface with the Mesa’s screen. The Mesa features five different touch profiles, including Finger, Stylus or Finger, Glove, Stylus, and Wet. The finger touch profile is designed to work with fingers only. The finger or stylus touch profile is designed to work with a finger(s) or stylus. The glove profile is designed to work with a variety of gloves. The stylus profile is designed to work with the fine tip stylus in dry conditions. The wet profile is designed to work with the blunt tip stylus or your finger. The wet profile helps the screen reject any false inputs that may be caused by water droplets or water pooling on the screen. The fine tip stylus will not function when using the wet profile.
Switching profiles on Windows 10
The default setting for touch profiles on Windows 10 is the hard tip stylus or finger. To change the touch profile on desktop mode, select the “Touchscreen Profiles” application on the main screen. From there the option to choose one of the five different touch profiles will be available for selection. Once a new profile is selected the device takes a moment to update.
Switching profiles on Android
To change touch profiles on the Mesa running Android 9.0 swipe from the top of the display towards the bottom twice. The notifications center will now be on display. The application is called Touch Control. If you don’t see the Touch Control application on the first screen, then swipe from the right side of the display to the left.
Another way of accessing touch profiles on a Mesa running Android 9.0 is to go to the Settings application and then selecting Touch Controls within the settings menu.
Want to learn more about touchscreen profiles? Click here to get more information about how a rugged mobile computer display stays ultra-responsive in rain or shine.
Programmable keys on Windows and Android
There are three programmable keys available on the Windows 10 version of the Mesa. These keys are p1, p2, and p3. To program these keys to your specific preferences, you will want to select the keypad icon on the desktop by double-clicking on it. This will give you the option of programming keys p1, p2, or p3. If you select any of these keys to program, you will open a drop-down list of over 20 different functions these keys can perform.

For the Android version of the Mesa, all keys can be programmed except for the power button on the far right. To access the option to program these keys, you will swipe from the bottom of the display screen to the top. Then you will select the “Settings” icon and from there you will select “Keypad”. The options to change any of the keys for the device are available to select here. Once you have selected which key you would like to program, you will have a new screen display with the various options you can apply to that key.

Click here to learn more about how you can quickly adjust your favorite settings or access an important feature with one simple click.
Barcode reader and software
A barcode reader is an expansion that can be applied to the Windows 10 or Android 9.0 versions of the Mesa. This module can read both 1D and 2D barcode models and is integrated within the device. These barcode modules support UPC, QR codes, postal codes, and composite codes. For jobs that require a lot of barcode reading, there is a pistol grip accessory available. The pistol grip feature is a programmable trigger button. The pistol grip is specifically designed for ergonomic comfort and ease of use. This accessory has been tested with the tablet to be ultra-rugged. To make the job easier, there is a visible aiming bullseye with low-light illumination.
In addition to the pistol grip, Mesa devices that ship with barcode readers installed also include Juniper’s Barcode Connector application installed. The Barcode Connector is an application on the desktop of the device and serves as a wedge between the device and the data recording software. This allows information from the barcode to be automatically put into the field you have selected within a data collection application.
Learn more about barcode readers for rugged handhelds here.
RFID Reader
The Mesa is also available with an integrated Ultra High Frequency (UHF) RFID reader. There is a standard half watt reader available, as well as a high-powered reader at 1 watt. The difference between these two readers is the range for reading. Standard is between 12-18 inches and the high-powered reader is capable of reading from 2-6 feet away. An internal antenna is installed on the back of the device and region-specific frequency configurations are available.
An application called RFID Connector is available and is similar to the Barcode Connector app mentioned above.
Click here to learn about the 4 things you should know before testing UHF RFID.
M2/3 Office Dock
The Mesa Office Docking Station includes an HDMI port, ethernet jack, power delivery, and three USB ports. These ports allow you to connect the tablet to a mouse, keyboard, monitor, and network. This is particularly ideal for those who use the device in the office and for fieldwork.
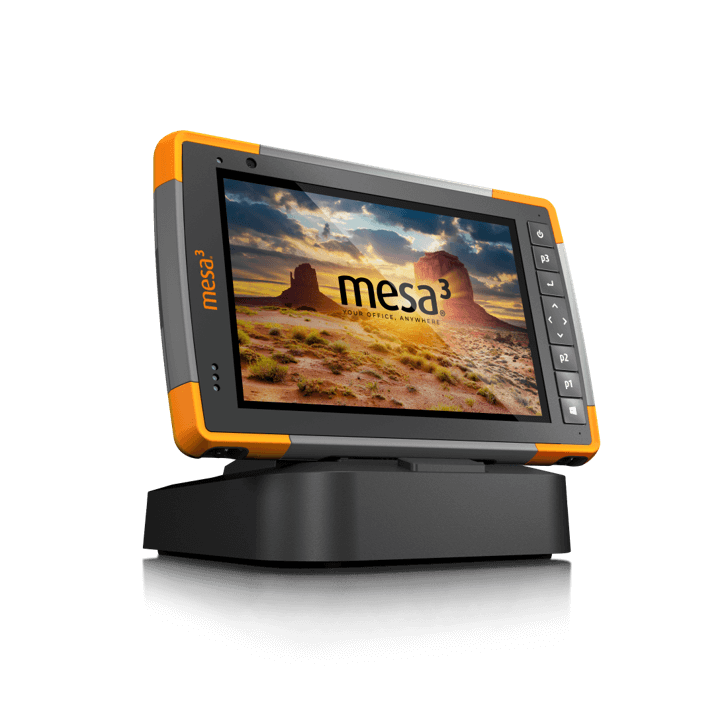
For more information about docking your Mesa Rugged Tablet, click here.
Let’s Connect
The Mesa Rugged Tablet is a robust and powerful data collection tool. Getting the most out of this tool is important to Juniper. Should you have any other questions, please feel free to contact us here. Our in-house experts will be happy to answer your questions.